Collection: Tatou Wrapper (Traditional Art & Calligraphy Storage Paper)
TATOU
Traditional Wrapping Paper for Preserving Calligraphy Works
Tatou is a traditional Japanese folded wrapping paper, also known as tatou-gami, used to carefully store and protect valuable items.
It is commonly used to wrap calligraphy and painting works created on firm materials such as shikishi boards and tanzaku strips.
In Japan, durable and thick washi paper has long been valued for safeguarding important belongings.
Beyond calligraphy, washi wrapping has been used for shrine amulets, ofuda, and ceremonial envelopes, reflecting a deep respect for the contents within.
Paper naturally regulates humidity according to the surrounding environment and offers a balanced softness, making it an ideal material for preservation.
Tatou is especially suitable for flat works rather than three-dimensional objects, which makes it perfect for calligraphy and artwork storage.
We highly recommend using tatou to preserve your precious works with care.
In addition to storage, it is also well suited as refined wrapping for important gifts.
Basic Wrapping Method
Simple and Easy — Just Fold into Thirds
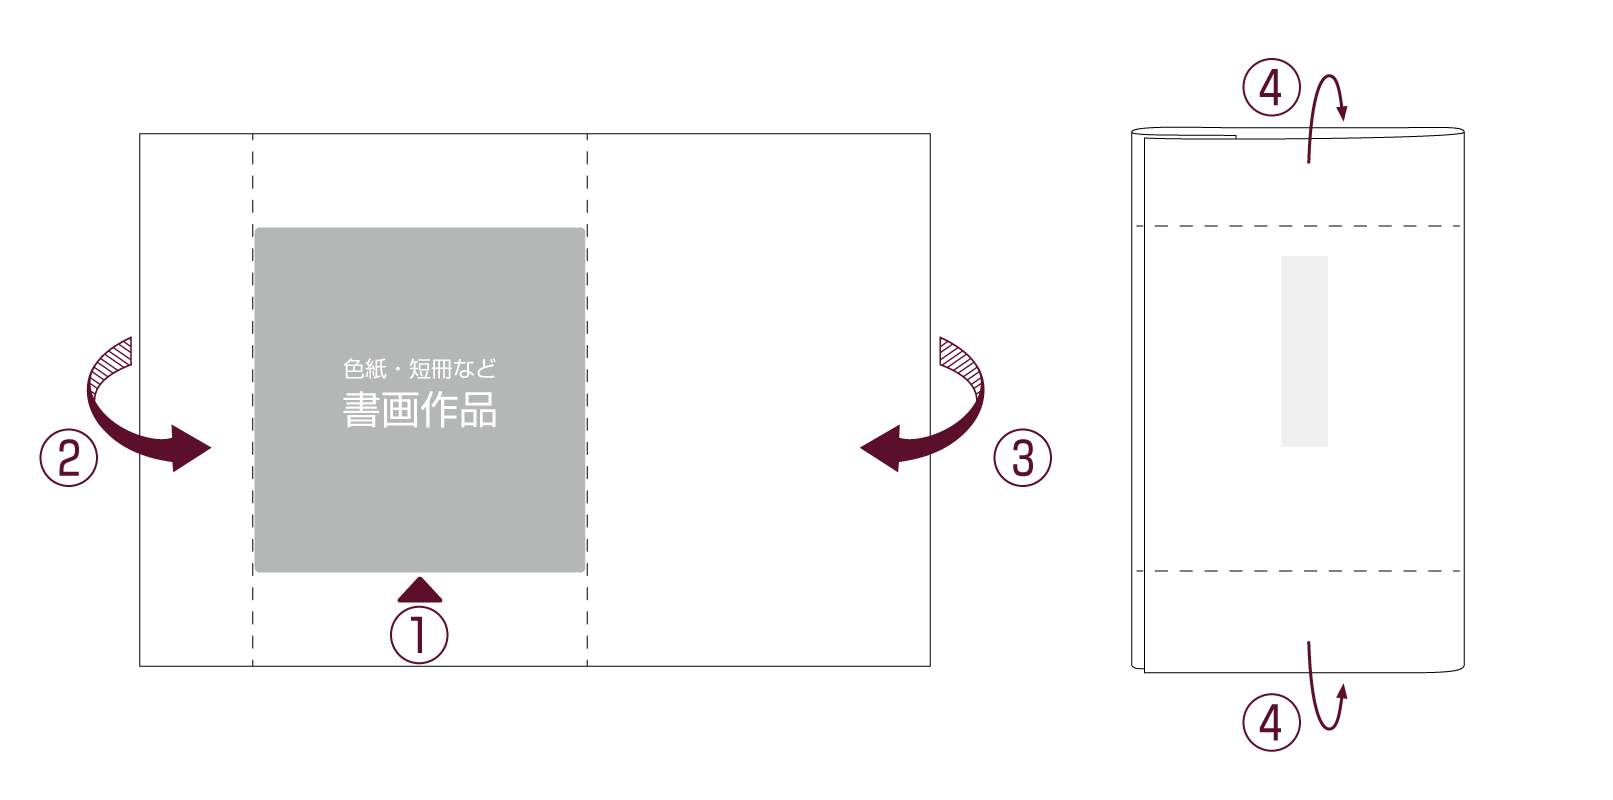
Here is a basic explanation of how to wrap items using tatou paper.
Although it may seem difficult at first, the method is actually very simple and requires no special techniques.
In essence, the paper is folded into thirds to wrap the work securely.
Once you understand the basics, the technique can be adapted to various sizes and purposes.
The key point is to fold the paper so that the right side overlaps the front, then fold the top and bottom edges inward.
-
First, unfold the tatou paper and place the artwork in the center.
If the paper is pre-folded, open it gently along the creases.
Depending on the size of the artwork, it may be positioned slightly off-center. - Fold the sides so that the right side comes to the front, starting by folding the left side.
- Next, fold the right side over the left.
- Once the sides are folded, fold the top and bottom edges toward the back to complete the wrapping.
-
F4 Shikishi Tatou New Unryu With Base 1 Sheet
Regular price ¥180 JPYRegular price¥250 JPYSale price ¥180 JPYSale -
Mini Shikishi Tatou New Unryu With Base 1 Sheet
Regular price ¥70 JPYRegular price¥100 JPYSale price ¥70 JPYSale -
Large Shikishi Tatou New Unryu With Base 1 Sheet
Regular price ¥140 JPYRegular price¥200 JPYSale price ¥140 JPYSale -
Large Shikishi Tatou New Unryu With Base 1 Sheet
Regular price ¥110 JPYRegular price¥160 JPYSale price ¥110 JPYSale -
Large Shikishi Tatou New Unryu No Base 1 Sheet
Regular price ¥80 JPYRegular price¥110 JPYSale price ¥80 JPYSale


